

QAQC Checklist – Ceramic Tile (Flooring)
$4.99
Use this ceramic floor tile quality control checklist to check for items both before and after installation.
Templates are starting points. Adapt them to your contract and to the laws and safety rules where you work. They are not legal advice.
Product FAQ
You will receive your documents and files immediately after you complete the checkout process. You will receive a link on the checkout page as well as via email.
As long as the document remains on Essential Construction you will be able to download it once purchased.
Yes, in most cases (with the exception of stock photography and ebooks) the files you will receive are editable.
We accept debit, all credit cards (Visa, Amex Mastercard etc) as well as payments via Apple Pay, Google Pay and Paypal.
Our return policy varies based on the product, for more information you can find our detailed return policy here.
Our documents are for use on your projects. You may not resell these documents on other marketplaces.
Full Description
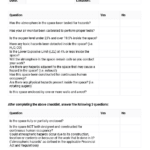
This flooring inspection checklist is built for ceramic floor tile. Use it to check the work before tile goes down and again after it is set and grouted, so problems are caught while they are still cheap to fix. A standard checklist also keeps every inspector on the project checking the same items.
What is a tile flooring inspection checklist?
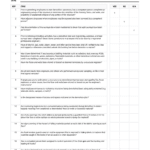
A tile flooring inspection checklist is a quality control form used to confirm that a tile floor is installed to the project requirements. It lists the items to check before installation, such as substrate condition and approved materials, and after installation, such as finish, alignment and grout. Each item is marked as accepted or not, with notes and a sign-off. The completed checklist becomes part of the project quality record.
When to use it
- Before a tile crew starts an area, to confirm the substrate and materials are ready.
- At hold points in your inspection and test plan for Division 09 finishes.
- After grouting, before the area is protected or handed over to the next trade.
- During a pre-handover or punch list walk with the owner or consultant.
- When rolling out the same quality standard across several floors, units or subcontractors.
What’s included
The template is a spreadsheet (.xlsx) for ceramic floor tile installation. It contains more than 10 inspection items, split between checks made before installation and checks made after the tile floor is installed. Because it is a spreadsheet, you can add project-specific items, change wording to match your specification and print it for use on the jobsite.
How to fill it out
- Enter the project, area or room, and the installer before you start.
- Have the specification, approved submittals and layout drawing on hand.
- Walk the area before installation and mark each pre-installation item as accepted or not accepted.
- Do not release the area for tiling until open items are fixed and rechecked.
- After grouting, inspect the finished floor against the post-installation items.
- Record any defects with location and photo references, assign who will fix them and set a date.
- Sign and date the checklist, get the installer’s signature and file it with your quality records.
Tips
- Check substrate flatness and cleanliness before work starts. Most tile problems begin there.
- Confirm movement joint locations with the drawings before tile covers the slab joints.
- Tap-test a sample of tiles after curing to find hollow spots early.
- Inspect with good light at a low angle. It shows lippage and uneven joints.
Related templates and guides
- QAQC Checklist – Stone Flooring
- Quality Assurance Checklist – Stone and Tile Installation
- Request for Tiles Installation form
- Floor Tiling Productivity Monitoring Form
- Guide: Movement Joints in Tile Assemblies
Frequently asked questions
What should a tile inspection checklist include?
It should cover the substrate (clean, sound, flat and cured), approved tile and setting materials, layout and joint widths, movement joints, and slope to drains. After installation it should cover bond, lippage, grout joints, cuts at edges, cleaning and protection. Each item needs a pass or fail mark, notes and a sign-off.
How do you check floor tile for hollow spots?
Once the setting material has cured, tap tiles with a hard object such as a key or the handle of a tool and listen. A dull or hollow sound usually means poor mortar coverage or loss of bond under that tile. Mark the location on the checklist so the installer can investigate and replace tiles if needed.
What is lippage in tile installation?
Lippage is the height difference between the edges of two adjacent tiles. Too much lippage looks poor and can create a trip edge. The allowable amount depends on tile size, joint width and the standard referenced in your specification, so check the spec and record any locations that exceed it.
When should a flooring inspection be done?
Inspect at least twice: before installation, to accept the substrate and materials, and after grouting, to accept the finished floor. On larger jobs, add a check of the first area completed so any workmanship issues are corrected before the crew moves through the rest of the building.
Who signs off a tile flooring QAQC checklist?
Usually the general contractor’s superintendent or quality lead completes the checklist and the tile installer’s foreman signs to acknowledge it. On some projects the architect, consultant or owner’s representative also reviews or signs it at hold points. Follow the sign-off process set in your project quality plan.






Reviews
There are no reviews yet